Home
About us
Journal
FAQ
Home Improvements
Lifestyle
Ham Radio
Route Maps
Links


Interior Improvements

rev Dec 31 2018: updated existing items, no additions.


The "improvements" are in two major categories, Exterior and Interior. This page has the interior items. Go here if you want the page with exterior items.

We further divided the interior home improvements into three categories, primary, small, and really small changes. Their respective menus are below.

Here's the list of improvements inside our Airstream CCD 25 rolling home:

I1. oven tile

I2. shower step-off decking

I3. cabinet door pulls on doors of hidden interior spaces

I4. Washroom door latch

I5. Oxygenics® Shower Head

I6. breadboard knife rack under the new drawer

I7. additional drawer directly beside the kitchen sink

I8. Wilson Sleek cellular signal booster

I9. Outdoor thermometer

I10. light in lower pantry

I11. OCEANair® hatch shades on all windows

I12. Olympian® Wave6® catalytic heater

I13. magazine racks on back of dinette bench

I14. Trimetric 2025-RV battery monitor

I15. Salem vent sidewall ventilation

I16. Inverter for 110 volts AC power in trailer

Small stuff

S1. Hunter® digital thermostat furnace control

S2 hatch spring for the cabinet door over the refrigerator

S3 Bose® Virtually Invisible® surround sound speakers

S4. Sony® radio replacement for iPod compatibility

S5. wiring change to allow switching converter/charger off

S6. change of type, and relocation of, smoke detector

S7. rewiring light in bathroom

S8. five watt bipin lights to reduce 12volt power use

S9. LED light strips over dinette and galley

And the really small stuff:

R1. Ott-Lite® Task Light (OTL13TCG)

R2. laundry basket under dinette bench

R3. 12v portable fan for indoor or outdoor breeze comfort

R4. Drawer under dinette table

R5. Shopping List in Pantry Door


Go to Dreamstreamr Home Page

Go to Exterior Improvements

Go to What About The Failures?

Go to Dreamstreamr Home Improvements Page

E-mail Us at as4822@gmail.com


© dreamstreamr.com 2007-2019


R5. Shopping List Clipboard is handy on inside of Pantry Door

We showed our trailer to a couple of Airstreamers this Winter and one of them said, "Your website doesn't show this shopping list clipboard!" Now it does. Jim attached, with two #6X1/2" small pan head sheet metal screws, a small clipboard to the inside surface of our pantry door. Deb stocks it with either half-sheets of used printer paper or found small writing pads. The list is just above elbow height, convenient for jotting on. Whenever we finish a bottle or carton or box of anything, we add it to the list. The trick then is to remember to take the list with us when we head for the store.


picture of clipboard for shopping list
Return to top


L16. Inverter for 120 volts AC power in trailer

We tried a pocket inverter (75-150 watts) to convert 12vdc to 110vac in the truck or trailer. It was handy for running the alarm clock on the bedside table, the television, or charging battery-powered electronics like the phone, iPad, and computers. It even had enough power to run Deb's 110v curling iron. But we wanted something more, something more capable, something like what a dealer might install?

Our primary need was for the things mentioned in the prior paragraph, but with enough power for multiple receptacles or an outlet strip. We found a 400 watt modified sine wave inverter at a big box store for less than $100. It worked some things okay but showed its colors with one of the trailer's electronic clocks -- we gained five or ten minutes every hour on that clock. And the inverter's cooling fan was noisy and frequently running.

An Airstream club friend and fellow ham operator showed Jim his solution for this non-problem. Jack fed a remote receptacle from his inverter. He mounted the receptacle in his rear bumper. When boondocking he connects his trailer's power cord to the inverter-fed receptacle, after making sure his converter-charger is switched off and his refrigerator is on "gas". These two measures keep from overloading the inverter. Every 110vac receptacle plus the microwave clock are then operable. Cool!

picture of PROwattSW inverter

We bought a good quality pure sine wave 600 watt inverter, a Xantrex ProWatt (similar to the pictured unit). It's wired directly to the batteries with 42" long cables through a 80amp class-T fuse. Jim plugged in an outlet strip from the inverter to beside the sofa, and wired a 14-3 insulated tool cord from the inverter to inside the outdoor fridge cabinet. When we're boondocking, we can plug a short version of our trailer power cord into the inverter receptacle in the outdoor fridge cabinet. Bingo! Every 110vac outlet is powered from our inverter. Granted, we only have a 600 watt inverter, so the microwave and roof air can't run, and the fridge works better on propane. All clocks keep good time, we can use any outlet inside our outside, up to the rating of the inverter.

PROwatt SW remote switch

We also bought the remote switch to allow turning the inverter off and on without reaching under the sofa. We turn it off to conserve battery capacity and when we're towing. The remote switch is easy to access and readily indicates if the inverter is "on" or "off". A green LED atop the remote switch clearly marks the operation status. This is very convenient and we're enjoying it.


Return to top


L14. Trimetric 2025-RV battery monitor

Related to solar panels, batteries, and LED lighting, we recommend a smart battery monitor should precede any changes to battery capacity or loads. Don't plan or buy solar panels or batteries or LED lighting until you evaluate what you already are doing. Our battery enhancement was $1,000 and possibly overdone -- could we have gotten by with just replacing our original two 6v golf cart batteries instead of buying and mounting an additional battery box, cabling and terminals, junction box, and two more very heavy batteries?

picture of Trimetric 2025-RV meter

Debbie calls this smart meter a "marriage saver". Jim was putting her in the dark to save battery power, even tho she may have only just turned away from the lighted area for a second. The Trimetric series of battery monitors provides you complete information about your batteries charging and discharging, or in accounting terms, your battery power sources and uses. Why guess at how much battery you need, or how much solar panel capacity you should buy (an expensive choice to guess about) if you don't know how much power you are using?

With our Trimetric 2025-RV we have been able to determine the precise amount of each load. We haven't recorded them but now know how much current each light bank uses, how much current we use for transmitting on each ham radio, how much current our furnace uses, and how much our recharging of laptops is taking. We can see readily both the instantaneous charging level from our solar panels and our PDI Intellipower 9260 converter/charger. And most importantly we see day's accrued charge level. How much are we drawing down the batteries each day? Are we using more than we are replacing into the batteries?

Now we know. We use 45 to 85 amp hours per day. Even throughout the winter we can, in full sun and neither shaded nor clouded, replace what we're using. We sensed, before the quad batteries (installed Feb 2012) and before the Trimetric meter (installed Oct 2012) we could too easily refill the batteries and they just didn't seem to hold up to a day's use. Here's the kicker -- the Trimetric battery monitoring probably would have discouraged replacing the two 6v golf cart batteries with four 6v golf cart batteries.

Four batteries is awesome -- we have somewhere around 430 amp hours battery capacity (20hr rate per Interstate Battery Co). No matter how much we use in a day Jim still has enough left over to operate the HF ham radio (15-20 amp hours load) the next morning without first recharging the batteries. We are pretty sure too we could do the same if we only had two batteries -- they would come closer to full cycle but still do fine. Friends of ours have been making do just fine for years with two 6v golf cart batteries with the same uses and sources as ours.

UPDATE 20171215, Last year we removed two of the batteres we'd installed in 2012. They all four tested perfect condition but we learned we didn't need four. We'd gone for one year with two of the 6v 215 amp hour golf cart batteries, and this past January I added a 90 amp hour AGM to the system. I had such a great deal on it I couldn't resist, had a place for it under the sofa, and had found some mornings I could use just a little more amperage for the HF amateur radio to transmit on full power. So we're now at approx 300 amp hours and have done great boon docking for over two weeks at at time with this. How do we know we're doing great? The Trimetric 2025, of course.

The point is, without an accurate battery monitoring system you won't KNOW what you really are using per day. Before anyone installs a solar charging or enhanced battery system for anyone, we think they should firmly recommend two week's careful monitoring with a high-grade battery monitoring system like the Trimetric 2025. Less than $200 for the meter, shunt, and wiring, and maybe another $100 or $200 for labor (this install required a mechanic and a helper an hour or two) is a small price to pay to determine how best to spend solar panels or battery dollars. We highly recommend this battery monitor, the Trimetric 2025-RV. We bought ours from www.bestconverter.com


Return to top


L15. Salem Vent through-wall ventilation

We previously had opened a rear roof vent and a window near the front of the trailer to provide required ventilation when burning the catalytic heater. We discussed many times the advantage of adding a through-floor gravity air vent near the heater (and oven and stove, all propane-burning appliances) but didn't want to deal with cutting through the floor and potential unknown conditions below it.

We had an AHA! moment in Jun 2013 while visiting a friend's Airstream Eddie Bauer trailer -- They have
a Salem vent through the roadside wall near the floor level at one end of the trailer, and another in the ceiling at the trailer's other end. The Eddie Bauer edition of the Airstream has capabilities to haul a small ATV or larger motorcycle, with a large rear flip-up door, flip-up benches, and tie-downs inside. And it has low and high Salem vents to vent flammable vapors from the toys' fuel tank and lines, just in case.

Why couldn't we do the same? Except we wouldn't need to install a roof vent, we have a Fantastic Fan in the roof at each end of the trailer and each is covered with MaxxAir weather cover, to allow keeping the Fantastic Fan open in inclement weather. We only need a Salem Vent through the wall near our floor at the front of the trailer.

We ordered one with interior trim, but not as nice as the one offered by Airstream Co. Theirs includes a trim deep enough for the Airstream's wall thickness. The trim strip for ours required we add a piece of trim between the trim strip and the vent on the inside to complete the install. The job looks good, works great. We keep the vent open 24/7 except when driving. Would you believe it's one of the top three things most asked about when people visit our Airstream trailer?

You can see details about our installation at this page.


Return to top


S9. LED Light strips for dinette and galley, with double pole switches

We enjoy dry camping and prefer to use our quiet roof-top power generators, the solar panels. The lights we used for the dinette and galley were relatively hoggish about battery usage and serve areas we like illuminated often. We happened upon a couple of LED lighting strips at a hamfest in Mesa AZ. They are diminutive, only 1/4" by 3/8" by 18" long, use maybe less than 5 watts each (compared to up to 30 watts for the 3-light oem array), and provide brilliant light.

Jim added a selector switch for each of these LED strips. We still use the RV's light switch to turn on the light over the galley or over the dinette. The selector switches, slightly hidden from view, determine which lights get the power. This is easier than trying to remember whether we should use the halogen lights or the more battery-conserving LED lights. Just makes it easier to save energy.

Update Jan 2014 This was good until we replaced some of the incandescent down-lights with LED bulbs. Very happy with the new LED lights in our recessed fixtures, especially after adding parchment paper between the led and the lens to smooth the color (thanks Bob Manak for that tip!) Added a nice CFL bulb table lamp on the dinette, powered from the small inverter. We rarely use the LED strips above the dinette and galley.

UPDATE 27Apr2018, We're ready to de-wire and remove these LED strips for two reasons: we've found we have really good battery monitoring and capacity (thanks, Trimetric Monitor) and we installed LED G4 bipin lights on the most-often used lights, the two lights on the galley.


Return to top


I1. Slate tile for oven heat distribution

Our home's gas oven had hot spots due to less-than-optimal heat distribution. Debbie's initial efforts at baking would result in uneven bottom-browning as well as unequal cooking of one edge compared to another. We learned we could place a baking tile just above the burner atop the heat plate.

3/8-inch slate floor tile smooths our oven temperature nicely

We bought a terra cotta floor tile 1/2" X 12" X 12" from Lowes for $1, placed it in the oven. It immediately improved the evenness of our oven's baking. Unfortunately, eight months later on a bumpy stretch of secondary road near Boise, Idaho, the tile broke into a couple of pieces. We found a nearby Lowes and replaced it with a slightly thinner piece of slate. We chose the slate because Lowes didn't have the quarry tile.

Note, there is a great amount of information on the internet about what tiles not to use and why. The primary advice seems about avoidance of lead, mostly from glazes. The terra cotta quarry tile and the slate both are unglazed. The other advice was to pay upwards from $45 to almost $100 for a baking tile. You get what you pay for, and all that. We are happy with the results from the $1 tile except for it breaking in half after eight months, including driving from south Florida to Canada and crossing half of Canada.

Would a $50 tile not break, jarring about in our oven? We don't need to try it. This time we trimmed the corners and one edge so it nestles into the heat plate better. Meanwhile, the baking seems just as good as with the thicker quarry tile. The slate tile has lasted over six years (+/- 80,000 trailer miles) of travel without breaking.


Return to top


I2. Shower step-off decking

We bought our trailer after extensive research, climbing under, over, and all through it, and having previously had an Airstream CCD 22 of the same model year. The important stuff ought to be pretty much the same, right? Who knew the toilet in the CCD 25's is elevated a couple of inches higher? Our feet don't touch the floor, honest. Well, maybe our toes do.

Raised floor deck at shower and toilet

Jim threatened for a long time to build a sauna deck for the floor space in front of the toilet, just outside the shower stall. Turned out recently we stayed a couple of weeks somewhere with a nice woodshop and some wood scraps. Jim spent an evening cutting this, and the next morning sanded and sealed it. The 2"X2" frame sits on five 3/8" rubber feet from mud flap cut-offs, and brass brads attach 1/2" slats to the 2 X 2s. White toilet seat elongated bumpers prevent it from chafing the white boards at the toilet and shower.

So far, so good. Someone was skeptical of this project but she seems to appreciate the more comfortable "sit" afforded by feet touching the ground. Jim realized, after building this, he could have used 1 X 2s for the frame, for a net savings of maybe one pound. Total it seems to weigh only a few pounds. It could be another inch taller too. Otherwise, it seems just what we wanted.

UPDATE 27Apr2018, We've refinished this little stepoff deck with light sanding and spray clear sealer. The sealer doesn't hold up well but we liked the smoothing and shine. We'll sand again and apply good urethane to it anon.


Return to top


I3. Cabinet door pulls on hinged access doors of hidden spaces under wardrobes and pantry:

Cabinet pulls On the one hand, some of these spaces house the little bits of mechanical, electrical, or plumbing equipment to support our camper. However the equipment items don't take much of the space and don't appear very at risk for harm from our storage of items nearby. The factory installed latches and hinges identical to those on the rest of the casework in the camper. We found a source for matching cabinet pulls and added them to three cabinet doors, one each under the pantry, Deb's wardrobe, and Jim's wardrobe. This increased our storage significantly, by allowing storage of our waste can, our small collection of adult beverages, with room left over.

Return to top


I4. Washroom door latch

Flush-mount door latches for wash room UPDATED Link (27Apr2018): Airstream installs these flush latches in the newer Airstreams, and the elimination of the long lever handle is very smart. Many times we caught a pocket or belt loop or sleeve on the wash room door handle. Not any more! Thanks to AirForums we learned about a reasonably priced source for these latches from Perlane Sales. Ours is a MR-04-106-24. You can see it at this link from Southco. Phoned the order in, told them it is for an Airstream interior door. They knew exactly what to help us order and the latch arrived in three days from ordering. It installed very easily and only required about an hour to complete the job. Looks great, works great.


Return to top


I5. Oxygenics® Shower Head:

Oxygenics shower head We heard about the Oxygenic Shower Head, with almost cultish praise, at 2008's Easter Rally in St Augustine and again at the WBCCI International Rally in Bozeman, MT the same year. In a way, though, it seemed a little like promoting something as mundane as a toilet tank fill valve. What are you going to do, stand in your neighbor's bathroom and test his plumbing? So we didn't test it. And we were a little skeptical about the fantastic praise these water-saving shower heads generate.

But being the romantic, Jim happened upon one on sale and bought it for Deb's birthday. (What a romantic, right?) Then he couldn't wait for her birthday and he gave it to both of us during an extended caravan. Well, it is fantastic, does greatly improve the water velocity, feels great, and could save water. We laugh about the last claim because while it does reduce the flow rate even while increasing the spray sensation, it feels so good we want to stay in the shower longer. Well, we can afford that luxury when we have full hook-ups and when we are dry-camping we can benefit from the new shower head's reduced flow rate. We highly recommend this product. Ours is a Chrome #130-XLF25, and we paid $45 including free shipping from Amazon.com. Camping World stores often have these on the racks at reasonable prices, too.

UPDATE Apr 2012, A couple of years later we found a nice in-line flow control for the shower head. It works more easily than the one in our Oxygenics, and we've notice some of the Oxygenics heads don't even have flow control. No problem, find one at your local RV supply store for $7-10.


Return to top


I6. Breadboard knife rack under the new drawer:
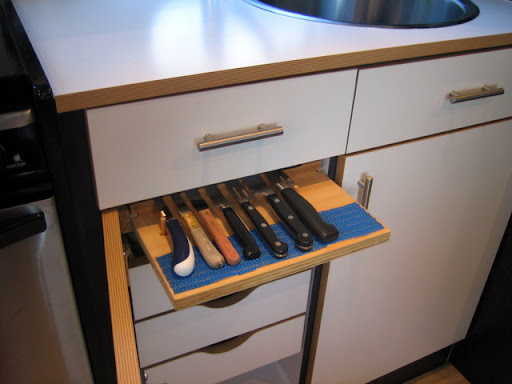
knife_drawer While shopping for a source for the RV-style drawer guides we came upon guides for a 3/4 inch thick sliding breadboard. We ordered these for approx $10 including shipping (also from http://www.houckind.com/ model 120BB)at the same time to install two inches below the new drawer in an almost four inch space above the tallest existing drawer. We installed a magnetic knife holder on a piece of birch plywood and can now hold all but one of our eight kitchen knives. Yeah, only eight. We had at least twice as many in our house and thinned the collection down to the few we knew we had to have. These are an eight inch serrated bread knife, an eight inch carving knife, a six inch boning knife, a pair of four inch serrated tomato knives, and two paring knives. Only one knife doesn't fit on the new knife board and we use it daily, a very sharp serrated cheese cutter we store in its own sleeve.


Return to top


I7. Additional drawer directly beside the kitchen sink:

utensil_drawer A credit to Airstream Company has always been the optimal use of spaces in the camper. Sometimes though, we're willing to go even a little further. In our 2005 Airstream, we are delighted to have found a potential drawer space thirteen inches wide by sixteen inches long by four inches deep beside the galley sink. Jim cut the dead-front panel in line with the meeting edge for the cabinet doors immediately below. He added drawer pulls for the new drawer front and for the now-shorter dead-front, and attached rv-style guides (cost approx $10 including shipping from http://www.houckind.com/ model 950rv) and a drawer. The rv-style drawer guides prevent accidental opening while rolling down the road. The result is a drawer wide enough for a silverware organizer plus small boxes of plastic utensils at the sides and back of the organizer.


Return to top


I8. Wilson Sleek cellular signal booster:

The Wilson Sleek improved our cellular signal inside the trailer. We use it primarily for our Verizon Mifi and sometimes for the iPhone when connectivity is especially poor and we need voice. It makes a real difference for us. The Sleek kit we bought isn't available, but other similar ones seem to be still. Ours has a 2" antenna (magnetic mount) for rooftop, a 12vdc power adapter, a glue-on wall mount, and clips to hold snugly against the pad several different sized hotspots or phones. Our biggest benefit is connectivity when we're staying in locations with poor cellular service. We also like having improved mobile wifi availability on towing days - the hotspot in it's cradle radiates fine up to the truck cab.

The hotspot stays in the trailer, plugged into 12 volt power. As we travel down the road the mifi changes towers without problems and provides us 2-way signal up to the truck cab. The passenger is able to use our iPads more easily and without having to keep up with where on the dash the hotspot will ride and see cellular antennas. Too, we get one to two bars better signal with the Wilson Sleek and its little roof-top antenna than we did with the hotspot sitting inside the aluminum-walled trailer. We paid around $140 for this in 2015, and would buy it again unless we found another model that was higher performing without being excessively expensive. This model was priced at around $180 in 2017. More info is available at
Wilson Sleeks website

UPDATE 27Apr2018, A reader advised us April 2018 Wilson no longer offers the Sleek. The new unit lists at $350 according to Wilson's website on 27 Apr 2018. You can see this at Wilson RV cellular amplifiers website For much more and much smarter coverage on this issue I recommend you see Technomadia's excellent page at Technomadia's cellular boosters for RVs & Boats Overview page.

Wilson Sleek and antenna Installed Wilson Sleek cradle


Return to top


I9. Outdoor Thermometer:

This provides us an easy-to-read outdoor temperature from inside the trailer. Attaches to the window exterior surface via a suction cup (we stow it inside before we tow.) We can see it through the trailer's heavily tinted window glass, it costs less than $10, and uses a small replaceable watch battery. Thanks to Jack White for showing us this in North Ft Myers a couple of years ago.

UPDATE:27Apr2018, Added photo.

nice outdoor thermometer


Return to top


I10. Light in lower pantry:

We enjoy browsing IKEA occasionally. They started displaying and selling various LED strips for inside their drawer fronts. In 2014 they were selling a 12" strip with AAA batteries, and it automatically turned on and off when you operated a drawer or cabinet door. This allows us some automatic lighting in the small cabinet under Debbie's wardrobe, where we keep a few extra cans and bottles that won't fit in the pantry.The automatic LED lighting is just right to light up the space for 15 seconds before it shuts off.

Update Dec 31 2018, We cannot find the AAA-powered led light strips at IKEA. Probably responsible design for them, eliminating disposable batteries in this nice light. Now the similar lights at IKEA are powered by small 120vac transformers (wall-warts). We would still like it for this application but would have to figure out from where we'd get the 120vac since most of the trailer's wiring is 12vdc.


Return to top


I11. The OCEANair® hatch shades:
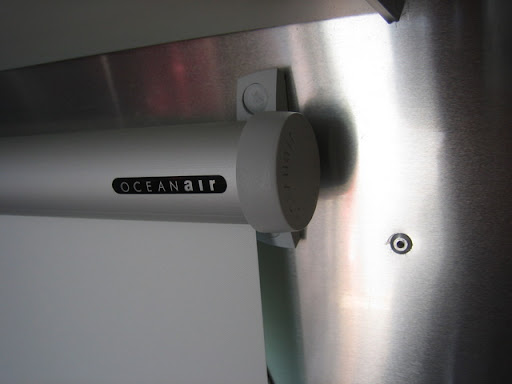
hatch_shade_cassette hatch_shade


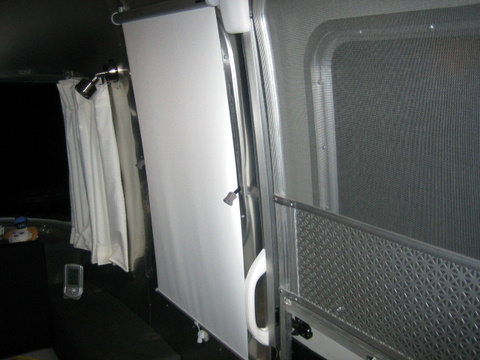
We installed these throughout the trailer. We think replacing the old vinyl roller shades with these hatch shades is one of the most attractive changes we've made. These shades fit closely to the wall of the trailer and most of them will tuck in under the lifting handles to hold the shade even snugger to the wall for better privacy. The OceanAir shades look so much better than the original vinyl roller shades -- Airstream Co seems to agree, they now install these on some of their models. We purchased our shades from Airstream while we were at Jackson Center September 2007 having other work done. Airstream had a window schematic for our model trailer with dimensions and part numbers. Their prices were far better than what we had found on the internet and no shipping. Jim installed them instead of paying Airstream hourly service rates. We reused some of the same holes from the original shades but where these didn't fit, we covered the old holes with rivets.
Return to top


I12. Olympian® Wave6® catalytic heater:
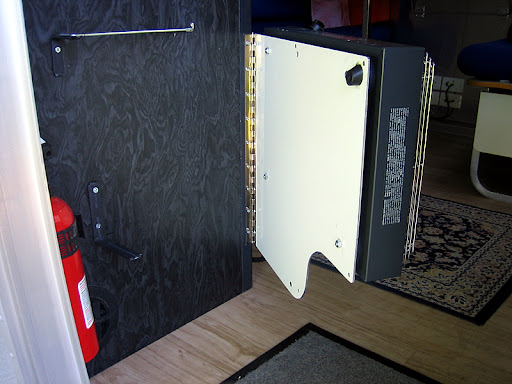
heaterheater

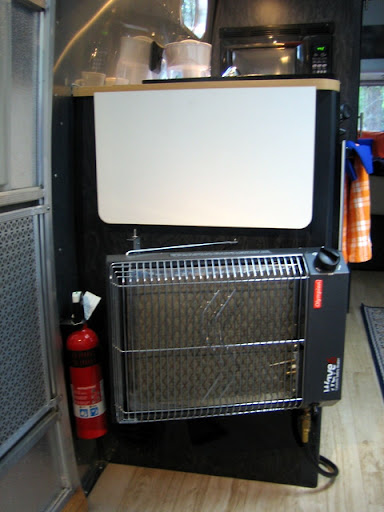
We had one motivation for adding a fourth heat mode in our Airstream. Two of the three heat sources (rooftop a/c heat strips; ceramic cube heater) require 110 volts (shore power) and the furnace requires a lot of battery for its fans. A catalytic heater burns propane, is extremely efficient (converts almost all the energy to heat), doesn't take a lot of space, is quiet, and uses NO battery or shore power. If we are camping without shore power this heater is great for daytime use -- it heats us wonderfully with radiant heat. It has a lighter (piezo) like a BBQ grill and three heat settings. We mounted it on a hinged plate on the end of the counter so it can be swiveled toward the dinette or the sofa. We like the warm radiant heat from our Olympian Wave6.

Funny thing -- we wondered if we should have considered a Wave 4, with its lower heat output. This Wave 6 was driving us outta here sometimes. Fall 2009 we dry camped alot in Washington and Idaho, often well above 2,000 feet and up to 6,000 feet. More recently, Winter 2014, we are traveling and camping in low 20s to 40s. The Wave 6 is just perfect, thank you. We run it on high or medium almost all the waking hours when it is below 50 F degrees outside and it keeps us very comfortable. So the Wave 6 is a great choice for us in our 25' trailer.

The downside of an unvented catalytic heater, and this is critically important to us, is it removes Oxygen from, and produces carbon monoxide into, our living space. We have to be very careful to adequately ventilate the camper whenever this heater is operating because the heater is unvented (note that you can purchase vented catalytic heaters instead.) We faithfully follow the manufacturer's recommendations for venting our camper whenever heating with this device. Until 2013 (when we added a low-wall intake vent,) we opened a window near the sofa and opened the rear fantastic fan a couple of inches, with fan "off." This creates a low to high fresh air current to refresh a portion of the interior air (See 2014 edit 2 paragraphs below.) We NEVER burn the catalytic heater when we are asleep, not even napping. We NEVER sleep with this heater on. Loss of oxygen is extremely dangerous -- you just fall asleep and don't wake up, ever.

edit 2/16/2010 -- we ran the Wave 6 all our waking hours (first time ever for such a long burn) one weekend while camped in a field in Orlando, FL, for Hamcation 2010. The weather was just crummy, rainy and cold all day. Opened a front window (before we had installed the Salem vent) and roof vent at opposite ends of the Airstream, and kept the heater on low the entire day. Wow, it was great to have heat! And, several days later as I edit this I'm on the sofa, just turned off the Olympics television coverage, and am enjoying the warm rays from the heater. Low setting is very comfortable, the trailer is 65 degrees but I am toasty.


See also on this page at the Salem vent sidewall ventilation near the floor ahead of the trailer's door. Really improved ventilation for the heater, oven and stove without resorting to opening windows for intake air. This has been a great solution for us. See more details see our blog article about installing the Salem vent. Also, see our web page with pictures about how the Wave 6 catalytic heater is mounted in our RV. The manufacturer's page is Salem vent


Return to top

I13. Magazine racks on back of the dinette bench:

mazazine_racks We first saw these in new Airstream International CCD 22s and really liked the clean design. We have sufficient gap between the back of the dinette bench and the arm of the L-sofa to accommodate these magazine racks. We ordered them from the Airstream factory store. They are very pricey but look and function great. They were available in white or black. As of May 2009 these are still available but only in black or orange and are approx $45 each. Ours are out of the way, very accessible, and don't clutter our space. They do make a little more challenging reaching the 110v receptacle against the roadside interior wall because the arm can still go where the eye can no longer see. Okay, I may install a small outlet strip on the back of the dinette directly above the receptacle beside the magazine rack. It's not been a big problem at all.


Return to top


S1. Hunter® digital thermostat furnace control:

thermostat The original furnace control was an inexpenisve bimetallic thermostat which provided NO indication whatsoever of the temperature you have set for heat -- you set it and guess. We wanted to be able to select a night low-limit (we use 45 degrees when we are sleeping) and in the morning set the temperature to a warmer temperature. We replaced the cheap t-stat with a $20 Hunter model 42999b two-wire electronic thermostat. (You can find similar thermostats with programmable feature for automatic setbacks and warmups like many people have in their houses, but these will cost from $35 to $40 and we didn't feel we needed it. We live in a 200 sf house and can reach the t-stat in 3 or 4 strides.)

Wiring was extremely simple -- we carefully removed the old thermostat, disconnected the two wires from its two terminals and attached the wires to the two terminals on back of the new thermostat. Instructions for the new thermostat were clear and complete. The new thermostat has an LCD display of present temperature and will display setpoint if you touch either button on the front. You can adjust the span (hysteresis) easily if you want. Best of all, you set a temperature for the furnace to maintain and this thermostat gets you there accurately. This thermostat or a similar one is probably available at super-size department stores everywhere. This improvement is over three years old, works wonderfully, and we've only replaced the 2 AA batteries once.

A funny undocumented feature we discovered last year - we can reset the furnace, in the unlikely event it trips, with the on-off switch on this Hunter t-stat. Previously we would start the furnace just before showers or bedtime to warm up a little. Sometimes the furnace would briefly run and then trip on some auto-detect failure condition. We originally were taught to reset it as follows: 1) open the furnace access panel outside with a large screwdriver; 2) locate the flashing red LED indicating trip condition; 3) momentarily press the reset switch; 4) observe the red LED light extinguishes; 5) close the furnace access panel and refasten the two screws to hold it closed.

Now we simply turn off the furnace selector switch (just inside the t-stat's left hand compartment door); turn off the on-off switch for a few seconds; turn on the on-off switch; hear (and feel) the furnace starting again. How easy is that? Cool!

Update Dec 31 2018 - The Hunter digital thermostat's pushbutton contacts are wearing out. We'll soon replace it with as similar a unit as available. It's been great for over ten years of daily use (in the few months annually we need heat).

Return to top


S2. Hatch spring for the cabinet door over the refrigerator:

hatch_spring This modification is so subtle yet so powerful for our use of the cabinet over our refrigerator. We were surprised there was no means of keeping the door open for the cabinet. We needed three hands to place anything in this small cabinet, one to keep the door up and two hands to arrange space and place the object. One day we were browsing in West Marine and found just the thing for this cabinet, a Spring Hatch Holder. This is a 8 1/2 inch stainless steel spring designed to hold a yacht deck hatch open. When extended, the spring becomes rigid and holds the door up. Pressing on the side of the spring releases the tension and allows the coil spring to fold out of the way and the door closes. Simple!

Return to top


S3. Bose® Virtually Invisible® surround sound speakers:

speaker
We used a Bose® subwoofer and two tiny Bose® cube speakers in our house for several years. These sound much brighter and deeper than the pair of five-inch Sony speakers factory-installed under the front roof locker. We left the front speakers and wiring in place but disconnected the wires eight inches from the radio and tied the Bose sound system in there instead. The two tiny cube speakers sit just inside the front roof locker, aimed out at the open curve of the camper's interior aluminum nose cone. The subwoofer fits between the dinette and the sofa, aimed at the camper's wall. It sounds really good and we still have the choice of fading from front to rear speakers. One of the best parts? Plug the television sound into the Sony radio and play movie's sound through the Bose system. Wow!
Return to top

UPDATE Apr 2012: This item moved to the Failures page although they work well. They didn't seem worth the weight and space required for the subwoofer, when we had placed it between the sofa and the dinette bench. The SONY 5" speakers sound really excellent and just don't need the Bose in this compartment.

UPDATE Jan 2014: We decided the Bose "almost invisible" cubes and the subwoofer really do sound better, and found a great place for subwoofer -- under the L-sofa. Space was available, speaker wiring was still there. We tuck it down with earthquake putty (like we used years ago to put posters on the walls). On deep notes, while we're watching a movie, our seat cushions rumble -- cool!


Return to top


S4. Sony® radio replacement for iPod compatibility:

radio Jim replaced the already out-of-date Sony® radio (no iPod jack) with a new model (SONY CDX-GT520) with iPod® interface built-in. The new radio, like the 2004 model, has remote control, plays CDs, sits hidden in a cabinet over the sofa, and controls speakers front and rear. This slightly newer radio additionally will play newer music formats, has more input jacks, and has high definition capability. We now can plug the iPod, portable TV, or the XM/Sirius receiver directly to the radio front face. All our music resides on the iPod® so we can easily select and play our music library through the radio. We had added a second XM account (we already had it in our Silverado) and more frequently pipe XM satellite music through our Sony to listen to the XM's pretty nice playlists. Works great.


Return to top


S5. Wiring change:

When we're in full sun locations we don't need the converter charger helping maintain our batteries. We felt we needed a way to switch the converter/charger off when operating on solar power without also turning off other circuits. We didn't like having the constant 13.8 volts charge power to the batteries because the batteries sometimes cannot tolerate well what may amount to overcharging.

May 2009: We replaced the old converter/charger with a PDI Intellipower 9260 and could leave it on full-time without worrying about overcharging the batteries. This is a great upgrade if you have a Parallax charger and are concerned about overcharging your batteries when on shore power. See also April 2018 update below:

Mar 2012: We installed tilt kits for solar panels and increased from two golf cart batteries to a set of four Interstate 6V batteries. We find we usually don't need the 110vac converter/charger for daily charging. Our batteries often are charged solely by solar power, and we use the converter/charger only for periodic equalizing.

January 2016: While four 230 amp hour golf cart batteries provided an awesome power bank, there were disadvantages. They added almost 175 pounds to the already heavy hitch weight. They would, if run down for a few days without sufficient recharging, require several days of sun to fully recharge them. We deleted two batteries, kept two of the four year-old golf cart batteries. This matches our two solar panels (2X125watts) to the two 6v 230 amp hour batteries. We can generally recharge each day of full sun.

April 2018: We changed the converter/charger to Best Converter's recommended Boondocker by PowerMax. Our PDI Intellipower faithfully charged and maintained our system for nine years. Recently it had started screaming at us when it heated up, instead of gradually scrolling up the cooling fan speed. We'd heard good things about the Boondocker and decided to try it. Installation was sort of a breeze - but because it just didn't fit well within the sheet metal, Jim moved the converter/charger unit to behind the enclosure (under our L-sofa). He didn't need therefore to cut and adapt the sheet metal box AND the unit gets more cooling. We'll see how this works.

Return to top


S6. Change of Type, & Relocation of smoke detector from living room to bedroom:

detectors

Every owner of an RV is likely, we think, to sleep in it. People sleeping aren't reliable at detecting smoke buildup in time to allow escape to safety. If someone gave you a choice of late alarm or fifteen minutes earlier alarm to a smoke condition in your sleep space, which would you choose?

In 2014 we replaced our single mode smoke detector. We had stumbled upon a strong recommendation to update to dual sensor smoke detectors in homes. The NFPA on their website states, "For each type of smoke alarm, the advantage it provides may be critical to life safety in some fire situations. Home fatal fires, day or night, include a large number of smoldering fires and a large number of flaming fires. You can not predict the type of fire you may have in your home or when it will occur. Any smoke alarm technology, to be acceptable, must perform acceptably for both types of fires in order to provide early warning of fire at all times of the day or night and whether you are asleep or awake."

For best protection, NFPA states in this paragraph their recommendation for use of both types of smoke alarm technologies. NFPA says, "For best protection, it is recommended both (ionization and photoelectric) technologies be used in homes. In addition to individual ionization and photoelectric alarms, combination alarms that include both technologies in a single device are available."

Kidde further states on their product sheet , "This smoke alarm combines both photoelectric and ionization sensors. Ionization sensing alarms may detect invisible fire particles (associated with flaming fires) sooner than photoelectric alarms. Photoelectric sensing alarms may detect visible particles (associated with smoldering fires) sooner than ionization alarms. Kidde strongly recommends that both ionization and photoelectric smoke alarms be installed to help insure maximum detection of the various types of fire that can occur within the home.

Originally the smoke detector was installed in the living room on the ceiling above the sofa. This, to us, added to the clutter of an otherwise beautiful curved ceiling already containing recessed lights and the television antenna hand crank. We relocated the smoke detector to the wall in the bedroom beside the CO detector and five inches below the ceiling to avoid the dead air pocket at the wall against the ceiling. We patched the two holes in the ceiling with 1/8" pop-rivets and you would not notice anything was removed. The new dual sensor smoke detector fit in the same place and, in our case, used the same mounting screws locations.
Return to top


Return to top


S7. Five watt bipin lights to reduce 12volt power use:

5 watt bipin lights Our Airstream has forty (40) 12 volt lights to illuminate the interior. Thirteen of these are ceiling lights, two are closet lights, two are vanity lights, four are reading lights, eight are task lighting, and the remaining eleven are indirect lights in the roof lockers. Thirty-five of these were ten watt quartz halogen lights.

An energy czar from Tennesee was said to have remarked, many years ago, "There is only one energy saving device, the on-off switch." This works well for us, we don't use much lighting in the first place. The only time the overhead lights are on is for cleaning the camper. We'll sometimes turn the indirect lights on because they just look so darned cool. Otherwise we only use the lighting we need to read, or cook, or put things away. Still, ten watt lights are really bright so we thought we'd try reducing the wattage (therefore, the power consumption) in half to five watt bulbs.

We found a very good source in Atlanta, GA (http://www.atlantalightbulbs.com/) with a wide variety of bulbs to serve our needs. We selected 5 watt xenon bulbs. They create less heat, have longer lives, and are sufficiently bright for all our indirect lights and our reading lights. Since these are the lights we use most often we can operate at almost one-half the lighting energy. This extends, a little, our battery life when we are not on shore power.
Return to top


We also are using four LightBlasters LEDs. We have four three-diode strips and three bayonet bases (as for automotive 1143 bulb bases). We have one in position A of the washroom ceiling fixture, one in the porch light, and one each in our two wardrobes. We like these in the limited applications. The LEDs produce plenty of light and use almost no power at all, compared to the 5 and 10 watt bulbs they replaced. Color quality isn't terribly important to us in these four spots. We're waiting on market pricing and color improvements to add LEDs to our living space.


Return to top


S8. Rewired the light in washroom:

Sometimes, at night, it helps a little to see what you're doing. Our bathroom lighting consists of two bright halogen lights above the vanity in the bedroom area, and a two-bulb fixture with a three-position switch in the toilet area. You cannot turn on the light in the toilet area without turning on the bright lights over the vanity. We don't need this much light at night and don't want to spotlight our sleeping lover. We rewired the fixture in the toilet area to operate independently of the vanity light. We accomplished it by tapping into the wiring for the bathroom exhaust fan. We removed the fan shroud. We cut a short piece of coathanger wire to fish the new wire from the light to the exhaust fan.

We cut and capped the switched leg from the vanity and reconnected the light to the fan's power. Many thanks to Dave and Martha Clark for the idea! This is so much better than blasting the bedroom with light just to have a little light in the washroom. We also changed the first light bulb on this double fixture to an LED bulb for energy-saving lighting.


Return to top


R1. Ott-Lite Task Light (OTL13TCG)

Debbie was working on a needlepoint project in 2008 and we realized pretty early the Airstream is not equipped with bright task lighting (and yes, we compounded the problem a little by downgrading our reading lights from 10 watts to 5 watts.) Visiting October 2008 with friends we were immediately impressed by her scrapbooking task light, a compact folding 110vac fluorescent tabletop light by Ott-Lite®. The light turns on and off automatically when the bulb holder is raised and lowered. The light is color-balanced for accurate color rendition and provides much more brightness for handwork. The light weighs less than three pounds and is compact enough to stow in the bottom of Deb's needlepoint bag when we visit others. We also like the self-contained ballast so when we store it there are no loose pieces. You can see the new version of this 13 watt model and others at
http://www.ott-lite.com/
Return to top


R2. Fantastic® Endless Breeze® 12v portable fan for indoor or outdoor breeze comfort:

Endless Breeze fan Summertime we sometimes are in areas boasting temperatures, at least temporarily, above 75 degrees. If the temperature gets a little too warm in the camper, or on the patio, we can turn on our portable 12v fan and direct it where we want the breeze. The camper has two 12 volt cigarette-type lighter sockets for power inside. We added a 12v power receptacle in the curbside cargo compartment so we can plug in the fan outside as well.

UPDATE: (27Apr2018) DEFROSTING - A great use for this fan is speeding defrost of our Dometic freezer. Empty the freezer entirely into the fridge or a cooler and turn off the fridge/freezer. We suspend the fan immediately in front of the open freezer compartment with a pair of reliable bungee cords. Place a dry towel on the freezer's floor. Within less than 30 minutes the freezer icing releases from the freezer wall. We dry the freezer compartment, turn it back on, and afer another 1/2 hour place the freezer food back in it.
Return to top


R3. Laundry basket under dinette's rear bench:

Laundry basket We carry enough clothes and linens for two weeks without laundering. We have enough changes of shirts, pants, socks and underwear to last without offense to anyone near or far. (at least, that's the theory) We tried this out on our trip to Vancouver BC last Fall and it worked very well and the same thus far this year. We wanted a convenient place to keep a week's dirty clothes until we move them to the larger laundry bag. We found a steel-framed woven reed basket at Michael's Crafts in Charlotte to fit precisely in a spare space under one of the dinette benches. There is enough room at the top to place clothes in without drawing the basket out. We line the basket with a mesh laundry bag we lift out when full and add the clothes to the larger laundry bag.

Return to top


R4. Drawer under dinette table

under-table drawer Jim frequently found himself inside the trailer with pants pockets still carrying bits and pieces of stuff that didn't belong inside. Rivets, bolts, washers, tye wraps, you name it, Jim looked for space on the sofa armrest or on an edge of the dinette table top. No longer! He installed a nifty add-on drawer under the dinette table. Camping World had these in stock during one of our visits in 2014. Jim spent all of ten minutes installing it, and saves that much every week not having to look for stuff that didn't have a home before.

It's just a handy spot to put frequently used items, like our scissors, small tape measure, a pencil, marker, pen, business cards, and a small writing pad. Sort of like a desk drawer, this has been handy and is out of sight when we don't have it open. Enough extra stuff finds it's way into this collector Jim goes through it monthly or so and picks out the hardware and miscellany and finds the real home for them, leaving just the stuff we would want to find here. Great deal for us.

One caveat! We found we must lock the drawer on towing days or it tries to work its way open. It hasn't dumped onto the floor yet but we're not offering the opportunity. We use a small paper spring clip clamped onto the drawer rail to "lock" the drawer closed on towing days. Added this step to our pre-flight checklist too!.


Return to top of this page

Go to Dreamstreamr Home Page

Go to What About The Failures?

E-mail Us at as4822@gmail.com


© dreamstreamr.com 2007-2019


::: Made with CoffeeCup : Web Design Software & Website Hosting :::